These are my notes and bookmarks, which I frequently reference online. Some of the content is my own, while other portions have been properly credited..
Spring is not 100% a replacement for Java EE — but it replaces almost all of Java EE’s painful parts and only relies on a few foundational Java EE/Jakarta EE APIs underneath.
Let’s break it down clearly.
Is Spring a full replacement for J2EE?
Practically YES (for most developers).
Technically NO (because Spring still uses a few underlying Java EE/Jakarta EE specs).
Spring was created specifically to replace the heavyweight parts of J2EE such as:
EJB (Enterprise JavaBeans)
J2EE container-managed transactions
J2EE security
J2EE messaging complexity
XML-heavy configuration
Vendor-specific application servers
Spring became the mainstream choice because it solves all those problems.
What parts of J2EE does Spring replace?
J2EE Component
Spring Replacement
EJB
Spring Beans, @Service, @Transactional
JSP/JSF/Servlet MVC complexity
Spring MVC (@RestController)
JTA (complex transactions)
Simplified Spring Tx + declarative transactions
JMS API complexity
Spring JMS abstractions
Security
Spring Security
JAX-RS
Spring Web (REST controllers)
Application Server (JBoss, WebLogic)
Embedded Tomcat/Jetty with Spring Boot
Spring basically eliminated the need for:
EAR files
WAR deployment to app servers
EJB containers
JNDI hell
XML descriptors
What parts of J2EE/Jakarta EE does Spring still depend on?
This is important:
✔ Spring still uses Servlet API
Even Spring MVC runs inside the Java EE Servlet model:
javax.servlet.* (Java EE era)
jakarta.servlet.* (Jakarta EE era)
Servlet API provides:
Request/response handling
Filters
Dispatchers
Underlying HTTP model
Spring Boot bundles embedded Tomcat/Jetty which implement this API.
✔ Spring integrates with JPA API
Spring Data JPA uses:
jakarta.persistence.*
JPA is still a Java EE/Jakarta spec, implemented by Hibernate, EclipseLink, etc.
✔ Spring integrates with JTA (optional)
If distributed transactions are needed.
✔ Spring can use JMS API
Spring JMS wraps JMS (Java Message Service).
Important distinction
Spring does NOT require a Java EE Application Server.
Everything can run with:
Embedded Tomcat
Jetty
Undertow
Netty (for WebFlux)
This is why Spring revolutionized Java development.
Spring depends on parts of Java EE specs (like Servlet & JPA API), but it does not depend on Java EE runtime containers like:
JBoss
WebSphere
WebLogic
GlassFish
Instead, Spring Boot bundles only the needed pieces inside your JAR.
Analogy (very intuitive)
Java = The language
J2EE = A big enterprise machine with many heavy parts
Spring = A modern toolkit that replaces 90% of that machine with lightweight tools
Spring Boot = Spring + Auto-config + Built-in engine + Ready to drive
Spring uses only a few base components of the old machine (Servlet, JPA specs), but otherwise runs independently.
Final Answer
Spring is effectively a full replacement for J2EE application development.
It no longer depends on Java EE containers, but it still uses a few core Java EE (now Jakarta EE) APIs—such as Servlets, JPA, JMS—as building blocks.
So:
Spring replaces the J2EE programming model, not the underlying J2EE/Jakarta EE specifications.
The `WEB-INF` folder is a crucial directory in Java web applications, specifically in applications that follow the Java Servlet or Java EE (Jakarta EE) standards. It is a special folder located within the web application's root directory and is used to store configuration files, libraries, and other resources that are not directly accessible to clients (e.g., web browsers). Here's a detailed breakdown of its purpose and contents:
Purpose of the WEB-INF Folder
1. Security:
The contents of the `WEB-INF` folder are not publicly accessible by clients. This ensures that sensitive files (e.g., configuration files, Java classes) cannot be accessed directly via a URL.
2. Organization:
It provides a standardized structure for organizing web application resources, making it easier to manage and deploy applications.
3. Deployment:
The `WEB-INF` folder is required for proper deployment of Java web applications. It contains essential files that the server (e.g., Apache Tomcat, Jetty) uses to configure and run the application.
Contents of the WEB-INF Folder
The `WEB-INF` folder typically contains the following subdirectories and files:
1. `web.xml` (Deployment Descriptor):
This is the most important file in the `WEB-INF` folder. It is an XML file that defines the configuration of the web application, including:
Servlet mappings.
Filters and listeners.
Context parameters.
Security constraints.
Welcome files.
- In modern applications (e.g., using Spring Boot), `web.xml` is often optional because configurations can be done using annotations or Java-based configuration.
2. `classes` Directory:
This directory contains compiled Java classes (`.class` files) for the application. These classes include:
Servlets.
Utility classes.
Any other application-specific Java code.
The structure of this directory mirrors the package structure of your Java classes.
3. `lib` Directory:
This directory contains JAR files (Java libraries) that the application depends on. These libraries are automatically included in the application's classpath by the server.
4. Other Configuration Files:
Depending on the framework or tools you use, the `WEB-INF` folder may also contain additional configuration files, such as:
`spring-config.xml` (for Spring Framework applications).
In this article, we talk about how Large Language Models (LLMs) work, from scratch — assuming only that you know how to add and multiply two numbers. The article is meant to be fully self-contained. We start by building a simple Generative AI on pen and paper, and then walk through everything we need to have a firm understanding of modern LLMs and the Transformer architecture. The article will strip out all the fancy language and jargon in ML and represent everything simply as they are: numbers. We will still call out what things are called to tether your thoughts when you read jargon-y content.
Going from addition/multiplication to the most advanced AI models today without assuming other knowledge or referring to other sources means we cover a LOT of ground. This is NOT a toy LLM explanation — a determined person can theoretically recreate a modern LLM from all the information here. I have cut out every word/line that was unnecessary and as such this article isn’t really meant to be browsed.
What will we cover?
A simple neural network
How are these models trained?
How does all this generate language?
What makes LLMs work so well?
Embeddings
Sub-word tokenizers
Self-attention
Softmax
Residual connections
Layer Normalization
Dropout
Multi-head attention
Positional embeddings
The GPT architecture
The transformer architecture
Let’s dive in.
The first thing to note is that neural networks can only take numbers as inputs and can only output numbers. No exceptions. The art is in figuring out how to feed your inputs as numbers, interpreting the output numbers in a way that achieves your goals. And finally, building neural nets that will take the inputs you provide and give you the outputs you want (given the interpretation you chose for these outputs). Let’s walk through how we get from adding and multiplying numbers to things like Llama 3.1.
A simple neural network:
Let’s work through a simple neural network that can classify an object:
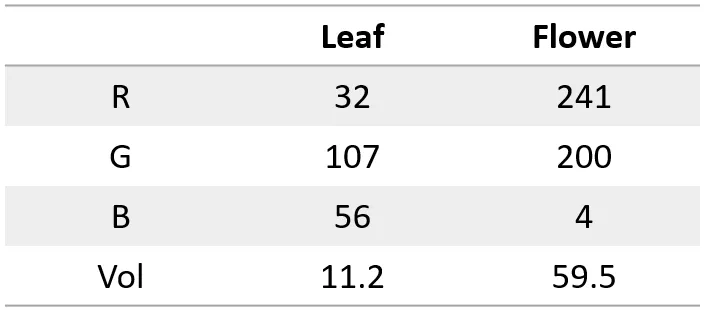
Object data available: Dominant color (RGB) & Volume (in milli-liters)
Classify into: Leaf OR Flower
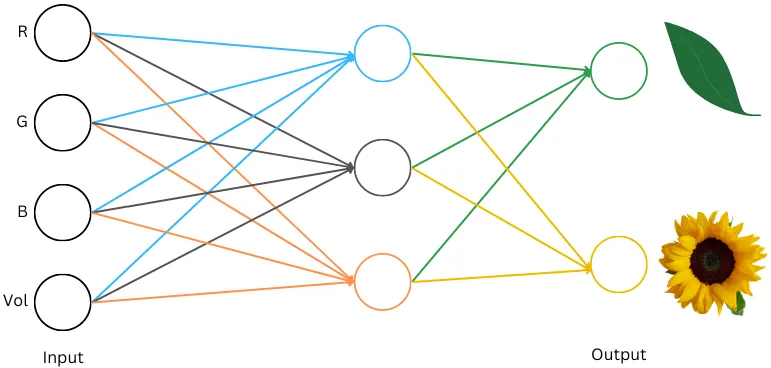
Here’s what the data for a leaf and a sunflower can look like:
Image by author
Let’s now build a neural net that does this classification. We need to decide on input/output interpretations. Our inputs are already numbers, so we can feed them directly into the network. Our outputs are two objects, leaf and flower which the neural network cannot output. Let’s look at a couple of schemes we can use here:
We can make the network output a single number. And if the number is positive we say it’s a leaf and if it is negative we say it’s a flower
OR, we can make the network output two numbers. We interpret the first one as a number for leaf and second one as the number for flower and we will say that the selection is whichever number is larger
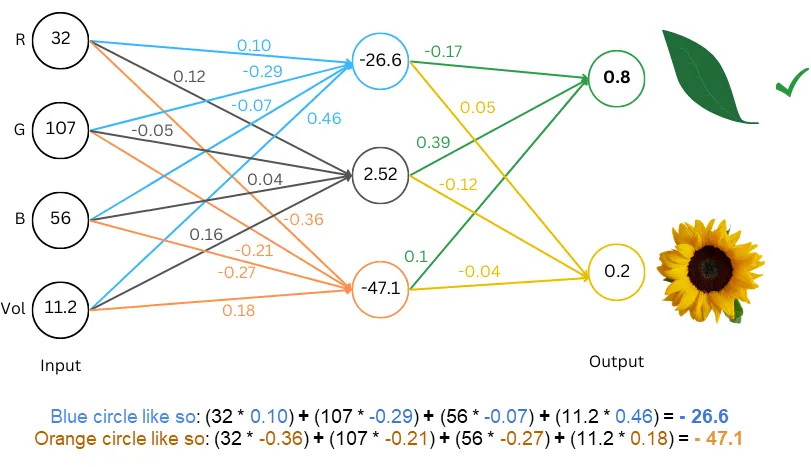
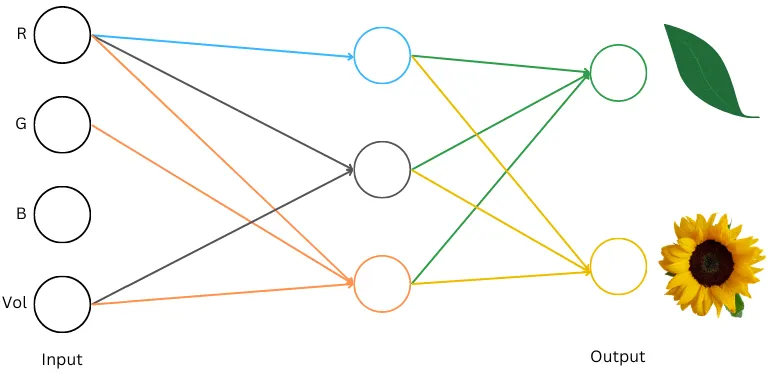
Both schemes allow the network to output number(s) that we can interpret as leaf or flower. Let’s pick the second scheme here because it generalizes well to other things we will look at later. And here’s a neural network that does the classification using this scheme. Let’s work through it:
Image by author
Some jargon:
Neurons/nodes: The numbers in the circles
Weights: The colored numbers on the lines
Layers: A collection of neurons is called a layer. You could think of this network as having 3 layers: Input layer with 4 neurons, Middle layer with 3 neurons, and the Output layer with 2 neurons.
To calculate the prediction/output from this network (called a “forward pass”), you start from the left. We have the data available for the neurons in the Input layer. To move “forward” to the next layer, you multiply the number in the circle with the weight for the corresponding neuron pairing and you add them all up. We demonstrate blue and orange circle math above. Running the whole network we see that the first number in the output layer comes out higher so we interpret it as “network classified these (RGB,Vol) values as leaf”. A well trained network can take various inputs for (RGB,Vol) and correctly classify the object.
The model has no notion of what a leaf or a flower is, or what (RGB,Vol) are. It has a job of taking in exactly 4 numbers and giving out exactly 2 numbers. It is our interpretation that the 4 input numbers are (RGB,Vol) and it is also our decision to look at the output numbers and infer that if the first number is larger it’s a leaf and so on. And finally, it is also up to us to choose the right weights such that the model will take our input numbers and give us the right two numbers such that when we interpret them we get the interpretation we want.
An interesting side effect of this is that you can take the same network and instead of feeding RGB,Vol feed other 4 numbers like cloud cover, humidity etc.. and interpret the two numbers as “Sunny in an hour” or “Rainy in an hour” and then if you have the weights well calibrated you can get the exact same network to do two things at the same time — classify leaf/flower and predict rain in an hour! The network just gives you two numbers, whether you interpret it as classification or prediction or something else is entirely up to you.
Stuff left out for simplification (feel free to ignore without compromising comprehensibility):
Activation layer: A critical thing missing from this network is an “activation layer”. That’s a fancy word for saying that we take the number in each circle and apply a nonlinear function to it (RELU is a common function where you just take the number and set it to zero if it is negative, and leave it unchanged if it is positive). So basically in our case above, we would take the middle layer and replace the two numbers (-26.6 and -47.1) with zeros before we proceed further to the next layer. Of course, we would have to re-train the weights here to make the network useful again. Without the activation layer all the additions and multiplications in the network can be collapsed to a single layer. In our case, you could write the green circle as the sum of RGB directly with some weights and you would not need the middle layer. It would be something like (0.10 * -0.17 + 0.12 * 0.39–0.36 * 0.1) * R + (-0.29 * -0.17–0.05 * 0.39–0.21 * 0.1) * G …and so on. This is usually not possible if we have a nonlinearity there. This helps networks deal with more complex situations.
Bias: Networks will usually also contain another number associated with each node, this number is simply added to the product to calculate the value of the node and this number is called the “bias”. So if the bias for the top blue node was 0.25 then the value in the node would be: (32 * 0.10) + (107 * -0.29) + (56 * -0.07) + (11.2 * 0.46) + 0.25 = — 26.35. The word parameters is usually used to refer to all these numbers in the model that are not neurons/nodes.
Softmax: We don’t usually interpret the output layer directly as shown in our models. We convert the numbers into probabilities (i.e. make it so that all numbers are positive and add up to 1). If all the numbers in the output layer were already positive one way you could achieve this is by dividing each number by the sum of all numbers in the output layer. Though a “softmax” function is normally used which can handle both positive and negative numbers.
How are these models trained?
In the example above, we magically had the weights that allowed us to put data into the model and get a good output. But how are these weights determined? The process of setting these weights (or “parameters”) is called “training the model”, and we need some training data to train the model.
Let’s say we have some data where we have the inputs and we already know if each input corresponds to leaf or flower, this is our “training data” and since we have the leaf/flower label for each set of (R,G,B,Vol) numbers, this is “labeled data”.
Here’s how it works:
Start with a random numbers, i.e. set each parameter/weight to a random number
Now, we know that when we input the data corresponding to the leaf (R=32, G=107, B=56, Vol=11.2). Suppose we want a larger number for leaf in the output layer. Let’s say we want the number corresponding to leaf as 0.8 and the one corresponding to flower as 0.2 (as shown in example above, but these are illustrative numbers to demonstrate training, in reality we would not want 0.8 and 0.2. In reality these would be probabilities, which they are not here, and we would them to be 1 and 0)
We know the numbers we want in the output layer, and the numbers we are getting from the randomly selected parameters (which are different from what we want). So for all the neurons in the output layer, let’s take the difference between the number we want and the number we have. Then add up the differences. E.g., if the output layer is 0.6 and 0.4 in the two neurons, then we get: (0.8–0.6)=0.2 and (0.2–0.4)= -0.2 so we get a total of 0.4 (ignoring minus signs before adding). We can call this our “loss”. Ideally we want the loss to be close to zero, i.e. we want to “minimize the loss”.
Once we have the loss, we can slightly change each parameter to see if increasing or decreasing it will increase the loss. This is called the “gradient” of that parameter. Then we can move each of the parameters by a small amount in the direction where the loss goes down (opposite the direction of the gradient). Once we have moved all the parameters slightly, the loss should be lower
Keep repeating the process and you will reduce the loss, and eventually have a set of weights/parameters that are “trained”. This whole process is called “gradient descent”.
Couple of notes:
You often have multiple training examples, so when you change the weights slightly to minimize the loss for one example it might make the loss worse for another example. The way to deal with this is to define loss as average loss over all the examples and then take gradient over that average loss. This reduces the average loss over the entire training data set. Each such cycle is called an “epoch”. Then you can keep repeating the epochs thus finding weights that reduce average loss.
We don’t actually need to “move weights around” to calculate the gradient for each weight — we can just infer it from the formula (e.g. if the weight is 0.17 in the last step, and the value of neuron is positive, and we want a larger number in output we can see that increasing this number to 0.18 will help).
In practice, training deep networks is a hard and complex process because gradients can easily spiral out of control, going to zero or infinity during training (called “vanishing gradient” and “exploding gradient” problems). The simple definition of loss that we talked about here is perfectly valid, but rarely used as there are better functional forms that work well for specific purposes. With modern models containing billions of parameters, training a model requires massive compute resources which has its own problems (memory limitations, parallelization etc.)
How does all this help generate language?
Remember, neural nets take in some numbers, do some math based on the trained parameters, and give out some other numbers. Everything is about interpretation and training the parameters (i.e. setting them to some numbers). If we can interpret the two numbers as “leaf/flower” or “rain or sun in an hour”, we can also interpret them as “next character in a sentence”.
But there are more than 2 letters in English, and so we must expand the number of neurons in the output layer to, say, the 26 letters in the English language (let’s also throw in some symbols like space, period etc..). Each neuron can correspond to a character and we look at the (26 or so) neurons in the output layer and say that the character corresponding to the highest numbered neuron in the output layer is the output character. Now we have a network that can take some inputs and output a character.
What if we replace the input in our network with these characters: “Humpty Dumpt” and asked it to output a character and interpreted it as the “Network’s suggestion of the next character in the sequence that we just entered”. We can probably set the weights well enough for it to output “y” — thereby completing “Humpty Dumpty”. Except for one problem, how do we input these lists of characters in the network? Our network only accepts numbers!!
One simple solution is to assign a number to each character. Let’s say a=1, b=2 and so on. Now we can input “humpty dumpt” and train it to give us “y”. Our network looks something like this:
Image by author
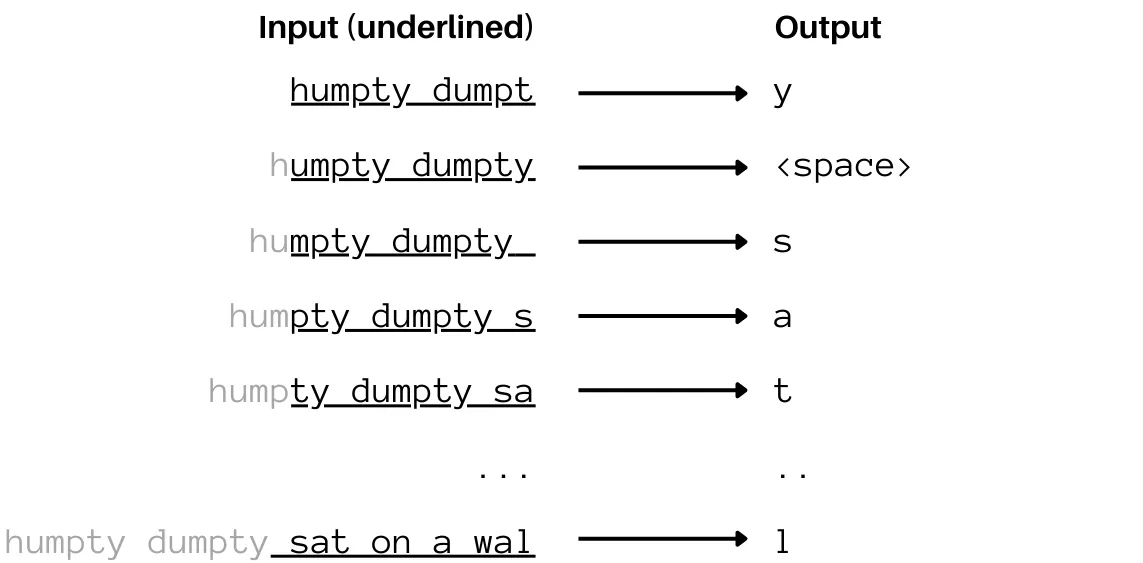
Ok, so now we can predict one character ahead by providing the network a list of characters. We can use this fact to build a whole sentence. For example, once we have the “y” predicted, we can append that “y” to the list of characters we have and feed it to the network and ask it to predict the next character. And if well trained it should give us a space, and so on and so forth. By the end, we should be able to recursively generate “Humpty Dumpty sat on a wall”. We have Generative AI. Moreover, we now have a network capable of generating language!Now, nobody ever actually puts in randomly assigned numbers and we will see more sensible schemes down the line. If you cannot wait, feel free to check out the one-hot encoding section in the appendix.
Astute readers will note that we can’t actually input “Humpty Dumpty” into the network since the way the diagram is, it only has 12 neurons in the input layer one for each character in “humpty dumpt” (including the space). So how can we put in the “y” for the next pass. Putting a 13th neuron there would require us to modify the entire network, that’s not workable. The solution is simple, let’s kick the “h” out and send the 12 most recent characters. So we would be sending “umpty dumpty” and the network will predict a space. Then we would input “mpty dumpty “ and it will produce an s and so on. It looks something like this:
Image by author
We’re throwing away a lot of information in the last line by feeding the model only “ sat on the wal”. So what do the latest and greatest networks of today do? More or less exactly that. The length of inputs we can put into a network is fixed (determined by the size of the input layer). This is called “context length” — the context that is provided to the network to make future predictions. Modern networks can have very large context lengths (several thousand words) and that helps. There are some ways of inputting infinite length sequences but the performance of those methods, while impressive, has since been surpassed by other models with large (but fixed) context length.
One other thing careful readers will notice is that we have different interpretations for inputs and outputs for the same letters! For example, when inputting “h” we are simply denoting it with the number 8 but on the output layer we are not asking the model to output a single number (8 for “h”, 9 for “i” and so on..) instead we are are asking the model to output 26 numbers and then we see which one is the highest and then if the 8th number is highest we interpret the output as “h”. Why don’t we use the same, consistent, interpretation on both ends? We could, it’s just that in the case of language, freeing yourself to choose between different interpretations gives you a better chance of building better models. And it just so happens that the most effective currently known interpretations for the input and output are different. In-fact, the way we are inputting numbers in this model is not the best way to do it, we will look at better ways to do that shortly.
What makes large language models work so well?
Generating “Humpty Dumpty sat on a wall” character-by-character is a far cry from what modern LLMs can do. There are a number of differences and innovations that get us from the simple generative AI that we discussed above to the human-like bot. Let’s go through them:
Embeddings
Remember we said that the way that we are inputting characters into the model isn’t the best way to do it. We just arbitrarily selected a number for each character. What if there were better numbers we could assign that would make it possible for us to train better networks? How do we find these better numbers? Here’s a clever trick:
When we trained the models above, the way we did it was by moving around weights and seeing that gives us a smaller loss in the end. And then slowly and recursively changing the weights. At each turn we would:
Feed in the inputs
Calculate the output layer
Compare it to the output we ideally want and calculate the average loss
Adjust the weights and start again
In this process, the inputs are fixed. This made sense when inputs were (RGB, Vol). But the numbers we are putting in now for a,b,c etc.. are arbitrarily picked by us. What if at every iteration in addition to moving the weights around by a bit we also moved the input around and see if we can get a lower loss by using a different number to represent “a” and so on? We are definitely reducing the loss and making the model better (that’s the direction we moved a’s input in, by design). Basically, apply gradient descent not just to the weights but also the number representations for the inputs since they are arbitrarily picked numbers anyway. This is called an “embedding”. It is a mapping of inputs to numbers, and as you just saw, it needs to be trained. The process of training an embedding is much like that of training a parameter. One big advantage of this though is that once you train an embedding you can use it in another model if you wish. Keep in mind that you will consistently use the same embedding to represent a single token/character/word.
We talked about embeddings that are just one number per character. However, in reality embeddings have more than one number. That’s because it is hard to capture the richness of concept by a single number. If we look at our leaf and flower example, we have four numbers for each object (the size of the input layer). Each of these four numbers conveyed a property and the model was able to use all of them to effectively guess the object. If we had only one number, say the red channel of the color, it might have been a lot harder for the model. We’re trying to capture human language here — we’re going to need more than one number.
So instead of representing each character by a single number, maybe we can represent it by multiple numbers to capture the richness? Let’s assign a bunch of numbers to each character. Let’s call an ordered collection of numbers a “vector” (ordered as in each number has a position, and if we swap position of two numbers it gives us a different vector. This was the case with our leaf/flower data, if we swapped the R and G numbers for the leaf, we would get a different color, it would not be the same vector anymore). The length of a vector is simply how many numbers it contains. We’ll assign a vector to each character. Two questions arise:
If we have a vector assigned to each character instead of a number, how do we now feed “humpty dumpt” to the network? The answer is simple. Let’s say we assigned a vector of 10 numbers to each character. Then instead of the input layer having 12 neurons we would just put 120 neurons there since each of the 12 characters in “humpty dumpt” has 10 numbers to input. Now we just put the neurons next to each other and we are good to go
How do we find these vectors? Thankfully, we just learned how to train embedding numbers. Training an embedding vector is no different. You now have 120 inputs instead of 12 but all you are doing is moving them around to see how you can minimize loss. And then you take the first 10 of those and that’s the vector corresponding to “h” and so on.
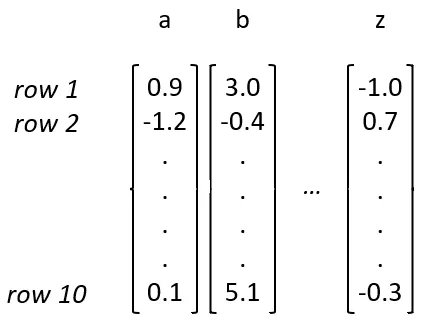
All the embedding vectors must of course be the same length, otherwise we would not have a way of entering all the character combinations into the network. E.g. “humpty dumpt” and in the next iteration “umpty dumpty” — in both cases we are entering 12 characters in the network and if each of the 12 characters was not represented by vectors of length 10 we won’t be able to reliably feed them all into a 120-long input layer. Let’s visualize these embedding vectors:
Image by author
Let’s call an ordered collection of same-sized vectors a matrix. This matrix above is called an embedding matrix. You tell it a column number corresponding to your letter and looking at that column in the matrix will give you the vector that you are using to represent that letter. This can be applied more generally for embedding any arbitrary collection of things — you would just need to have as many columns in this matrix as the things you have.
Subword Tokenizers
So far, we have been working with characters as the basic building blocks of language. This has its limitations. The neural network weights have to do a lot of the heavy lifting where they must make sense of certain sequences of characters (i.e. words) appearing next to each other and then next to other words. What if we directly assigned embeddings to words and made the network predict the next word. The network doesn’t understand anything more than numbers anyway, so we can assign a 10-length vector to each of the words “humpty”, “dumpty”, “sat”, “on” etc.. and then we just feed it two words and it can give us the next word. “Token” is the term for a single unit that we embed and then feed to the model. Our models so far were using characters as tokens, now we are proposing to use entire words as a token (you can of course use entire sentences or phrases as tokens if you like).
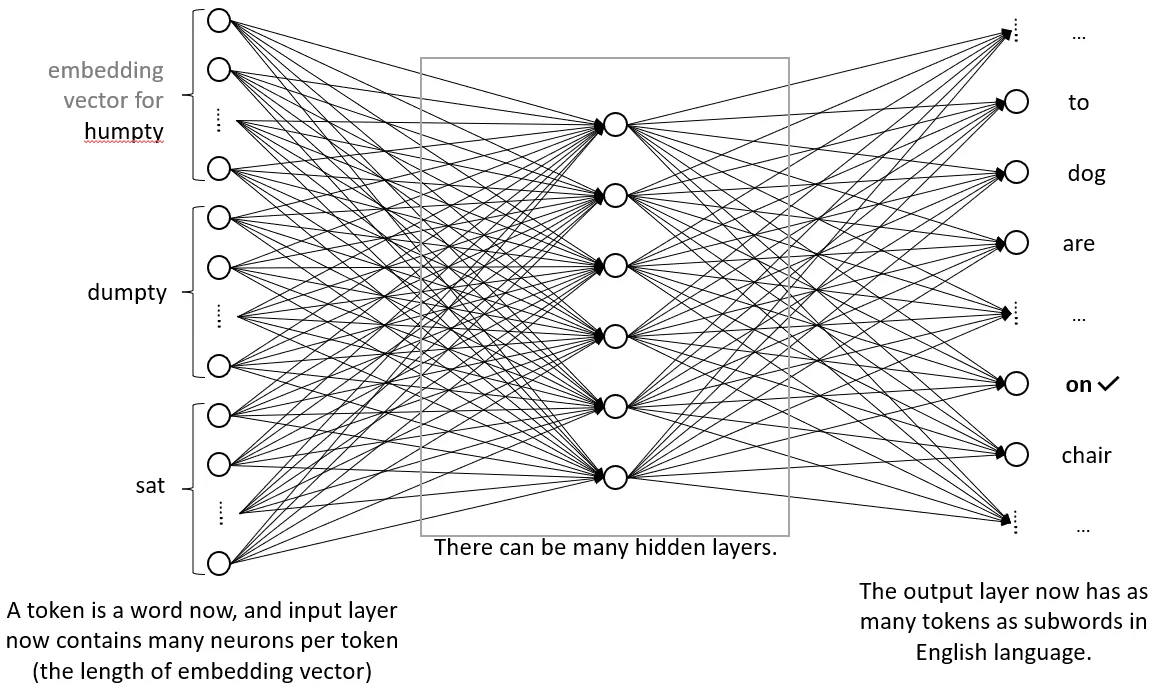
Using word tokenization has one profound effect on our model. There are more than 180K words in the English language. Using our output interpretation scheme of having a neuron per possible output we need hundreds of thousands of neurons in the output layer insead of the 26 or so. With the size of the hidden layers needed to achieve meaningful results for modern networks, this issue becomes less pressing. What is however worth noting is that since we are treating each word separately, and we are starting with a random number embeddings for each — very similar words (e.g. “cat” and “cats”) will start with no relationship. You would expect that embeddings for the two words should be close to each other — which undoubtedly the model will learn. But, can we somehow use this obvious similarity to get a jumpstart and simplify matters?
Yes we can. The most common embedding scheme in language models today is something where you break words down into subwords and then embed them. In the cat example, we would break down cats into two tokens “cat” and ”s”. Now it is easier for the model to understand the concept of “s” followed by other familiar words and so on. This also reduces the number of tokens we need (sentencpiece is a common tokenizer with vocab size options in tens of thousands vs hundreds of thousands of words in english). A tokenizer is something that takes you input text (e.g. “Humpty Dumpt”) and splits it into the tokens and gives you the corresponding numbers that you need to look up the embedding vector for that token in the embedding matrix. For example, in case of “humpty dumpty” if we’re using character level tokenizer and we arranged our embedding matrix as in the picture above, then the tokenizer will first split humpty dumpt into characters [‘h’,’u’,…’t’] and then give you back the numbers [8,21,…20] because you need to look up the 8th column of the embedding matrix to get the embedding vector for ‘h’ (embedding vector is what you will feed into the model, not the number 8, unlike before). The arrangement of the columns in the matrix is completely irrelevant, we could assign any column to ‘h’ and as long as we look up the same vector every time we input ‘h’ we should be good. Tokenizers just give us an arbitrary (but fixed) number to make lookup easy. The main task we need them for really is splitting the sentence in tokens.
With embeddings and subword tokenization, a model could look something like this:
Image by author
The next few sections deal with more recent advances in language modeling, and the ones that made LLMs as powerful as they are today. However, to understand these there are a few basic math concepts you need to know. Here are the concepts:
Matrices and matrix multiplication
General concept of functions in mathematics
Raising numbers to powers (e.g. a3 = a*a*a)
Sample mean, variance, and standard deviation
I have added summaries of these concepts in the appendix.
Self Attention
So far we have seen only one simple neural network structure (called feedforward network), one which contains a number of layers and each layer is fully connected to the next (i.e., there is a line connecting any two neurons in consecutive layers), and it is only connected to the next layer (e.g. no lines between layer 1 and layer 3 etc..). However, as you can imagine there is nothing stopping us from removing or making other connections. Or even making more complex structures. Let’s explore a particularly important structure: self-attention.
If you look at the structure of human language, the next word that we want to predict will depend on all the words before. However, they may depend on some words before them to a greater degree than others. For example, if we are trying to predict the next word in “Damian had a secret child, a girl, and he had written in his will that all his belongings, along with the magical orb, will belong to ____”. This word here could be “her” or “him” and it depends specifically on a much earlier word in the sentence: girl/boy.
The good news is, our simple feedforward model connects to all the words in the context, and so it can learn the appropriate weights for important words, But here’s the problem, the weights connecting specific positions in our model through feed forward layers are fixed (for every position). If the important word was always in the same position, it would learn the weights appropriately and we would be fine. However, the relevant word to the next prediction could be anywhere in the system. We could paraphrase that sentence above and when guessing “her vs his”, one very important word for this prediction would be boy/girl no matter where it appeared in that sentence. So, we need weights that depend not only on the position but also on the content in that position. How do we achieve this?
Self attention does something like adding up the embedding vectors for each of the words, but instead of directly adding them up it applies some weights to each. So if the embedding vectors for humpty,dumpty, sat are x1, x2, x3 respectively, then it will multiply each one with a weight (a number) before adding them up. Something like output = 0.5 x1 + 0.25 x2 + 0.25 x3 where output is the self-attention output. If we write the weights as u1, u2, u3 such that output = u1x1+u2x2+u3x3 then how do we find these weights u1, u2, u3?
Ideally, we want these weights to be dependent on the vector we are adding — as we saw some may be more important than others. But important to whom? To the word we are about to predict. So we also want the weights to depend on the word we are about to predict. Now that’s an issue, we of course don’t know the word we are about to predict before we predict it. So, self attention uses the word immediately preceding the word we are about to predict, i.e., the last word in the sentence available (I don’t really know why this and why not something else, but a lot of things in deep learning are trial and error and I suspect this works well).
Great, so we want weights for these vectors, and we want each weight to depend on the word that we are aggregating and word immediately preceding the one we are going to predict. Basically, we want a function u1 = F(x1, x3) where x1 is the word we will weight and x3 is the last word in the sequence we have (assuming we have only 3 words). Now, a straightforward way of achieving this is to have a vector for x1 (let’s call it k1) and a separate vector for x3 (let’s call it q3) and then simply take their dot product. This will give us a number and it will depend on both x1 and x3. How do we get these vectors k1 and q3? We build a tiny single layer neural network to go from x1 to k1 (or x2 to k2, x3 to k3 and so on). And we build another network going from x3 to q3 etc… Using our matrix notation, we basically come up with weight matrices Wk and Wq such that k1 = Wkx1 and q1 =Wqx1 and so on. Now we can take a dot product of k1 and q3 to get a scalar, so u1 = F(x1,x3) = Wkx1 · Wqx3.
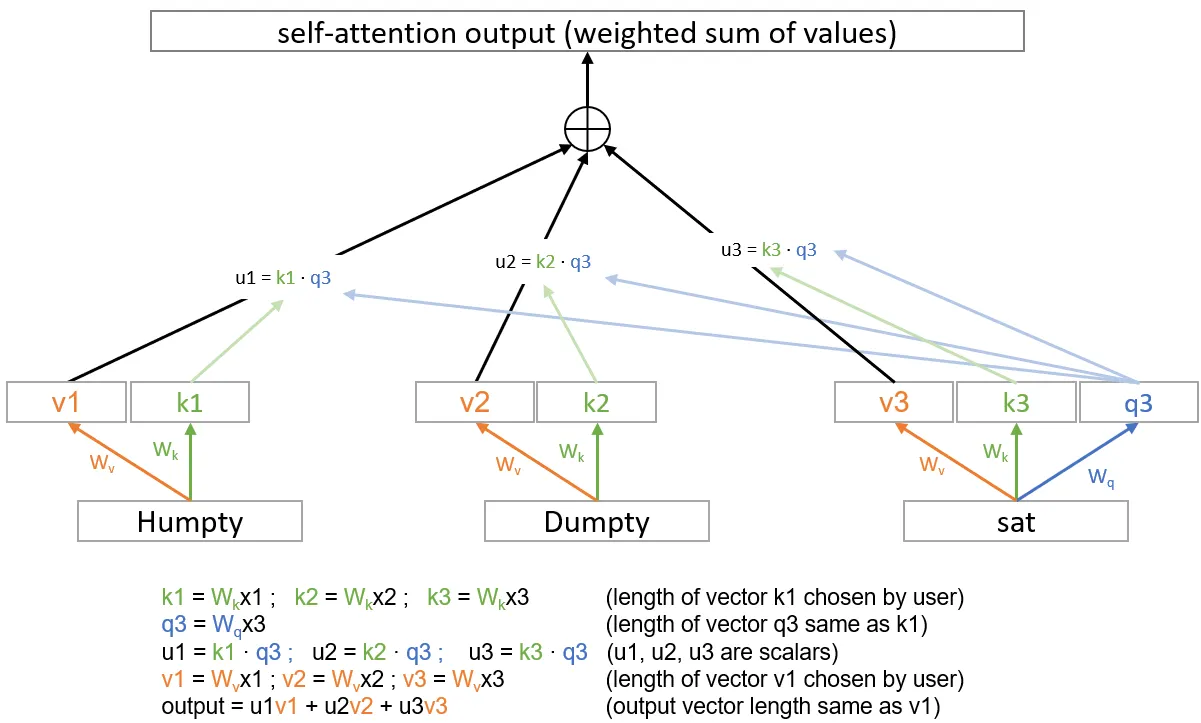
One additional thing that happens in self-attention is that we don’t directly take the weighted sum of the embedding vectors themselves. Instead, we take the weighted sum of some “value” of that embedding vector, which is obtained by another small single layer network. What this means is similar to k1 and q1, we also now have a v1 for the word x1 and we obtain it through a matrix Wv such that v1=Wvx1. This v1 is then aggregated. So it all looks something like this if we only have 3 words and we are trying to predict the fourth:
Self attention. Image by author
The plus sign represents a simple addition of the vectors, implying they have to have the same length. One last modification not shown here is that the scalars u1, u2, u3 etc.. won’t necessarily add up to 1. If we need them to be weights, we should make them add up. So we will apply a familiar trick here and use the softmax function.
This is self-attention. There is also cross-attention where you can have the q3 come from the last word, but the k’s and the v’s can come from another sentence altogether. This is for example valuable in translation tasks. Now we know what attention is.
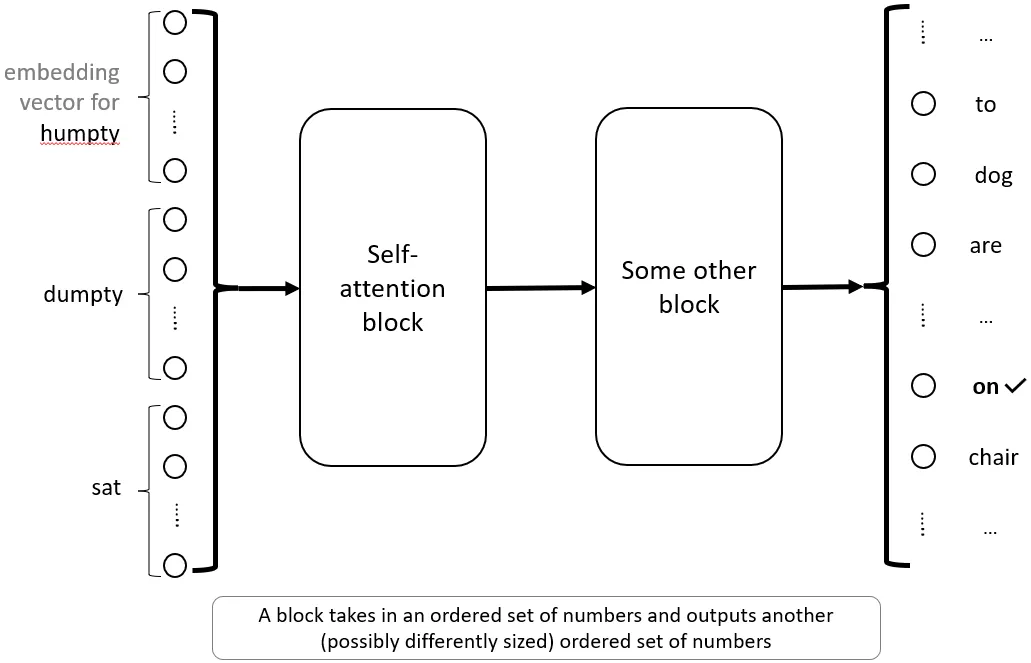
This whole thing can now be put in a box and be called a “self attention block”. Basically, this self attention block takes in the embedding vectors and spits out a single output vector of any user-chosen length. This block has three parameters, Wk,Wq,Wv — it doesn’t need to be more complicated than that. There are many such blocks in the machine learning literature, and they are usually represented by boxes in diagrams with their name on it. Something like this:
Image by author
One of the things that you will notice with self-attention is that the position of things so far does not seem relevant. We are using the same W’s across the board and so switching Humpty and Dumpty won’t really make a difference here — all numbers will end up being the same. This means that while attention can figure out what to pay attention to, this won’t depend on word position. However, we do know that word positions are important in english and we can probably improve performance by giving the model some sense of a word’s position.
And so, when attention is used, we don’t often feed the embedding vectors directly to the self attention block. We will later see how “positional encoding” is added to embedding vectors before feeding to attention blocks.
Note for the pre-initiated: Those for whom this isn’t the first time reading about self-attention will note that we are not referencing any K and Q matrices, or applying masks etc.. That is because those things are implementation details arising out of how these models are commonly trained. A batch of data is fed and the model is simultaneously trained to predict dumpty from humpty, sat from humpty dumpty and so on. This is a matter of gaining efficiency and does not affect interpretation or even model outputs, and we have chosen to omit training efficiency hacks here.
Softmax
We talked briefly about softmax in the very first note. Here’s the problem softmax is trying to solve: In our output interpretation we have as many neurons as the options from which we want the network to select one. And we said that we are going to interpret the network’s choice as the highest value neuron. Then we said we are going to calculate loss as the difference between the value that network provides, and an ideal value we want. But what’s that ideal value we want? We set it to 0.8 in the leaf/flower example. But why 0.8? Why no 5, or 10, or 10 million? The higher the better for that training example. Ideally we want infinity there! Now that would make the problem intractable — all loss would be infinite and our plan of minimizing loss by moving around parameters (remember “gradient descent”) fails. How do we deal with this?
One simple thing we can do is cap the values we want. Let’s say between 0 and 1? This would make all loss finite, but now we have the issue of what happens when the network overshoots. Let’s say it outputs (5,1) for (leaf,flower) in one case, and (0,1) in another. The first case made the right choice but the loss is worse! Ok, so now we need a way to also convert the outputs of the last layer in (0,1) range so that it preserves the order. We could use any function (a “function” in mathematics is simply a mapping of one number to another — in goes one number, out comes another — it’s rule based in terms of what will be output for a given input) here to get the job done. One possible option is the logistic function (see graph below) which maps all numbers to numbers between (0,1) and preserves the order:
Image by author
Now, we have a number between 0 and 1 for each of the neurons in the last layer and we can calculate loss by setting the correct neuron to 1, others to 0 and taking the difference of that from what the network provides us. This will work, but can we do better?
Going back to our “Humpty dumpty” example, let’s say we are trying to generate dumpty character-by-character and our model makes a mistake when predicting “m” in dumpty. Instead of giving us the last layer with “m” as the highest value, it gives us “u” as the highest value but “m” is a close second.
Now we can continue with “duu” and try to predict next character and so on, but the model confidence will be low because there are not that many good continuations from “humpty duu..”. On the other hand, “m” was a close second, so we can also give “m” a shot, predict the next few characters, and see what happens? Maybe it gives us a better overall word?
So what we are talking about here is not just blindly selecting the max value, but trying a few. What’s a good way to do it? Well we have to assign a chance to each one — say we will pick the top one with 50%, second one with 25% and so on. That’s a good way to do it. But maybe we would want the chance to be dependent on the underlying model predictions. If the model predicts values for m and u to be really close to each other here (compared to other values) — then maybe a close 50–50 chance of exploring the two is a good idea?
So we need a nice rule that takes all these numbers and converts them into chances. That’s what softmax does. It is a generalization of the logistic function above but with additional features. If you give it 10 arbitrary numbers — it will give you 10 outputs, each between 0 and 1 and importantly, all 10 adding up to 1 so that we can interpret them as chance. You will find softmax as the last layer in nearly every language model.
Residual connections
We have slowly changed our visualization of networks as the sections progress. We are now using boxes/blocks to denote certain concepts. This notation is useful in denoting a particularly useful concept of residual connections. Let’s look at residual connection combined with a self-attention block:
A residual connection. Image by author
Note that we put “Input” and “Output” as boxes to make things simpler, but these are still basically just a collection of neurons/numbers same as shown above.
So what’s going on here? We are basically taking the output of self-attention block and before passing it to the next block, we are adding to it the original Input. First thing to note is that this would require that the dimensions of the self-attention block output must now be the same as that of the input. This is not a problem since as we noted the self-attention output is determined by the user. But why do this? We won’t get into all the details here but the key thing is that as networks get deeper (more layers between input and output) it gets increasingly harder to train them. Residual connections have been shown to help with these training challenges.
Layer Normalization
Layer normalization is a fairly simple layer that takes the data coming into the layer and normalizes it by subtracting the mean and dividing it by standard deviation (maybe a bit more, as we see below). For example, if we were to apply layer normalization immediately after the input, it would take all the neurons in the input layer and then it would calculate two statistics: their mean and their standard deviation. Let’s say the mean is M and the standard deviation is D then what layer norm is doing is taking each of these neurons and replacing it with (x-M)/D where x denotes any given neuron’s original value.
Now how does this help? It basically stabilizes the input vector and helps with training deep networks. One concern is that by normalizing inputs, are we removing some useful information from them that may be helpful in learning something valuable about our goal? To address this, the layer norm layer has a scale and a bias parameter. Basically, for each neuron you just multiply it with a scalar and then add a bias to it. These scalar and bias values are parameters that can be trained. This allows the network to learn some of the variation that may be valuable to the predictions. And since these are the only parameters, the LayerNorm block doesn’t have a lot of parameters to train. The whole thing looks something like this:
Layer Normalization. Image by author
The Scale and Bias are trainable parameters. You can see that layer norm is a relatively simple block where each number is only operated on pointwise (after the initial mean and std calculation). Reminds us of the activation layer (e.g. RELU) with the key difference being that here we have some trainable parameters (albeit lot fewer than other layers because of the simple pointwise operation).
Standard deviation is a statistical measure of how spread out the values are, e.g., if the values are all the same you would say the standard deviation is zero. If, in general, each value is really far from the mean of these very same values, then you will have a high standard deviation. The formula to calculate standard deviation for a set of numbers, a1, a2, a3…. (say N numbers) goes something like this: subtract the mean (of these numbers) from each of the numbers, then square the answer for each of N numbers. Add up all these numbers and then divide by N. Now take a square root of the answer.
Note for the pre-initiated: Experienced ML professionals will note that there is no discussion of batch norm here. In-fact, we haven’t even introduced the concept of batches in this article at all. For the most part, I believe batches are another training accelerant not related to the understanding of core concepts (except perhaps batch norm which we do not need here).
Dropout
Dropout is a simple but effective method to avoid model overfitting. Overfitting is a term for when you train the model on your training data, and it works well on that dataset but does not generalize well to the examples the model has not seen. Techniques that help us avoid overfitting are called “regularization techniques”, and dropout is one of them.
If you train a model, it might make errors on the data and/or overfit it in a particular way. If you train another model, it might do the same, but in a different way. What if you trained a number of these models and averaged the outputs? These are typically called “ensemblemodels” because they predict the outputs by combining outputs from an ensemble of models, and ensemble models generally perform better than any of the individual models.
In neural networks, you could do the same. You could build multiple (slightly different) models and then combine their outputs to get a better model. However, this can be computationally expensive. Dropout is a technique that doesn’t quite build ensemble models but does capture some of the essence of the concept.
The concept is simple, by inserting a dropout layer during training what you are doing is randomly deleting a certain percentage of the direct neuron connections between the layers that dropout is inserted. Considering our initial network and inserting a Dropout layer between the input and the middle layer with 50% dropout rate can look something like this:
Image by author
Now, this forces the network to train with a lot of redundancy. Essentially, you are training a number of different models at the same time — but they share weights.
Now for making inferences, we could follow the same approach as an ensemble model. We could make multiple predictions using dropouts and then combine them. However, since that is computationally intensive — and since our models share common weights — why don’t we just do a prediction using all the weights (so instead of using 50% of the weights at a time we use all at the same time). This should give us some approximation of what an ensemble will provide.
One issue though: the model trained with 50% of the weights will have very different numbers in the middle neurons than one using all the weights. What we want is more ensemble style averaging here. How do we do this? Well, a simple way is to simply take all the weights and multiply them by 0.5 since we are now using twice as many weights. This is what Droput does during inference. It will use the full network with all the weights and simply multiply the weights with (1- p) where p is the deletion probability. And this has been shown to work rather well as a regularization technique.
Multi-head Attention
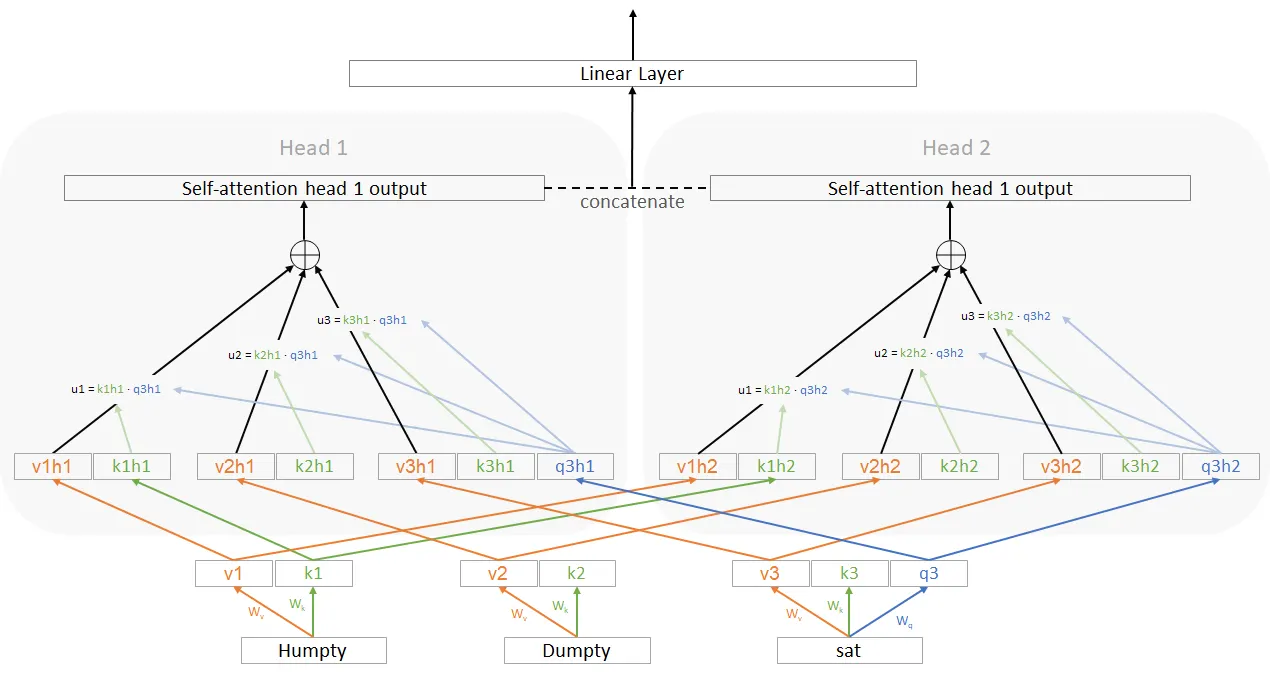
This is the key block in the transformer architecture. We’ve already seen what an attention block is. Remember that the output of an attention block was determined by the user and it was the length of v’s. What a multi-attention head is basically you run several attention heads in parallel (they all take the same inputs). Then we take all their outputs and simply concatenate them. It looks something like this:
Multi-head attention. Image by author
Keep in mind the arrows going from v1 -> v1h1 are linear layers — there’s a matrix on each arrow that transforms. I just did not show them to avoid clutter.
What is going on here is that we are generating the same key, query and values for each of the heads. But then we are basically applying a linear transformation on top of that (separately to each k,q,v and separately for each head) before we use those k,q,v values. This extra layer did not exist in self attention.
A side note is that to me, this is a slightly surprising way of creating a multi-headed attention. For example, why not create separate Wk,Wq,Wv matrices for each of the heads rather than adding a new layer and sharing these weights. Let me know if you know — I really have no idea.
Positional encoding and embedding
We briefly talked about the motivation for using positional encoding in the self-attention section. What are these? While the picture shows positional encoding, using a positional embedding is more common than using an encoding. As such we talk about a common positional embedding here but the appendix also covers positional encoding used in the original paper. A positional embedding is no different than any other embedding except that instead of embedding the word vocabulary we will embed numbers 1, 2, 3 etc. So this embedding is a matrix of the same length as word embedding, and each column corresponds to a number. That’s really all there is to it.
The GPT architecture
Let’s talk about the GPT architecture. This is what is used in most GPT models (with variation across). If you have been following the article thus far, this should be fairly trivial to understand. Using the box notation, this is what the architecture looks like at high level:
The GPT Architecture. Image by author
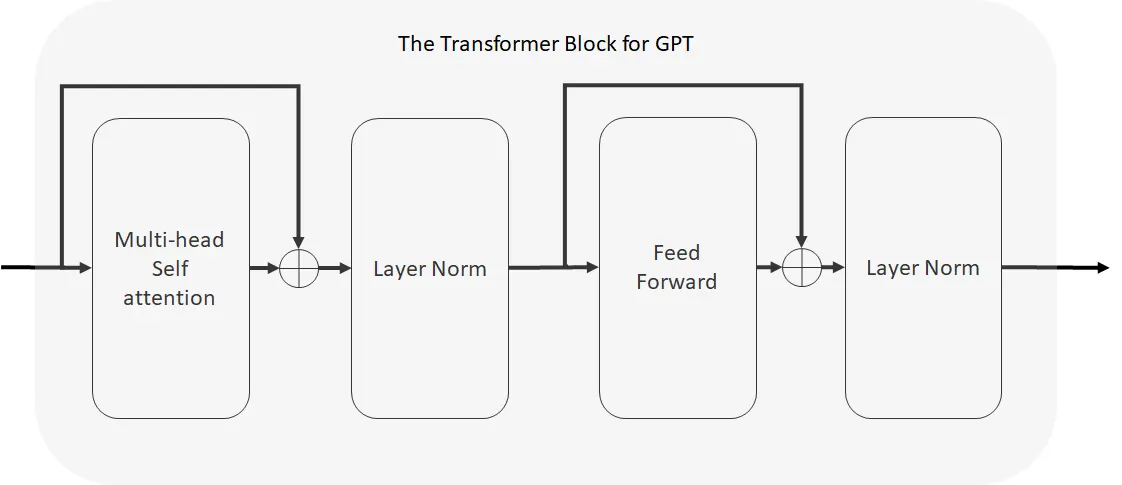
At this point, other than the “GPT Transformer Block” all the other blocks have been discussed in great detail. The + sign here simply means that the two vectors are added together (which means the two embeddings must be the same size). Let’s look at this GPT Transformer Block:
And that’s pretty much it. It is called “transformer” here because it is derived from and is a type of transformer — which is an architecture we will look at in the next section. This doesn’t affect understanding as we’ve already covered all the building blocks shown here before. Let’s recap everything we’ve covered so far building up to this GPT architecture:
We saw how neural nets take numbers and output other numbers and have weights as parameters which can be trained
We can attach interpretations to these input/output numbers and give real world meaning to a neural network
We can chain neural networks to create bigger ones, and we can call each one a “block” and denote it with a box to make diagrams easier. Each block still does the same thing, take in a bunch of numbers and output other bunch of numbers
We learned a lot of different types of blocks that serve different purposes
GPT is just a special arrangement of these blocks that is shown above with an interpretation that we discussed in Part 1
Modifications have been made over time to this as companies have built up to powerful modern LLMs, but the basic remains the same.
Now, this GPT transformer is actually what is called a “decoder” in the original transformer paper that introduced the transformer architecture. Let’s take a look at that.
The transformer architecture
This is one of the key innovations driving rapid acceleration in the capabilities of language models recently. Transformers not only improved the prediction accuracy, they are also easier/more efficient than previous models (to train), allowing for larger model sizes. This is what the GPT architecture above is based on.
If you look at GPT architecture, you can see that it is great for generating the next word in the sequence. It fundamentally follows the same logic we discussed in Part 1. Start with a few words and then continue generating one at a time. But, what if you wanted to do translation. What if you had a sentence in german (e.g. “Wo wohnst du?” = “Where do you live?”) and you wanted to translate it to english. How would we train the model to do this?
Well, first thing we would need to do is figure out a way to input german words. Which means we have to expand our embedding to include both german and english. Now, I guess here is a simply way of inputting the information. Why don’t we just concatenate the german sentence at the beginning of whatever so far generated english is and feed it to the context. To make it easier for the model, we can add a separator. This would look something like this at each step:
Image by author
This will work, but it has room for improvement:
If the context length is fixed, sometimes the original sentence is lost
The model has a lot to learn here. Two languages simultaneously, but also to know that <SEP> is the separator token where it needs to start translating
You are processing the entire german sentence, with different offsets, for each word generation. This means there will be different internal representations of the same thing and the model should be able to work through it all for translation
Transformer was originally created for this task and consists of an “encoder” and a “decoder” — which are basically two separate blocks. One block simply takes the german sentence and gives out an intermediate representation (again, bunch of numbers, basically) — this is called the encoder.
The second block generates words (we’ve seen a lot of this so far). The only difference is that in addition to feeding it the words generated so far we also feed it the encoded german (from the encoder block) sentence. So as it is generating language, it’s context is basically all the words generated so far, plus the german. This block is called the decoder.
Each of these encoders and decoders consist of a few blocks, notably the attention block sandwiched between other layers. Let’s look at the illustration of a transformer from the paper “Attention is all you need” and try to understand it:
Image from Vaswani et al. (2017)
The vertical set of blocks on the left is called the “encoder” and the ones to the right is called the “decoder”. Let’s go over and understand anything that we have not already covered before:
Recap on how to read the diagram: Each of the boxes here is a block that takes in some inputs in the form of neurons, and spits out a set of neurons as output that can then either be processed by the next block or interpreted by us. The arrows show where the output of a block is going. As you can see, we will often take the output of one block and feed it in as input into multiple blocks. Let’s go through each thing here:
Feed forward: A feedforward network is one that does not contain cycles. Our original network in section 1 is a feed forward. In-fact, this block uses very much the same structure. It contains two linear layers, each followed by a RELU (see note on RELU in first section) and a dropout layer. Keep in mind that this feedforward neetwork applies to each position independently. What this means is that the information on position 0 has a feedforward network, and on position 1 has one and so on.. But the neurons from position x do not have a linkage to the feedforward network of position y. This is important because if we did not do this, it would allow the network to cheat during training time by looking forward.
Cross-attention: You will notice that the decoder has a multi-head attention with arrows coming from the encoder. What is going on here? Remember the value, key, query in self-attention and multi-head attention? They all came from the same sequence. The query was just from the last word of the sequence in-fact. So what if we kept the query but fetched the value and key from a completely different sequence altogether? That is what is happening here. The value and key come from the output of the encoder. Nothing has changed mathematically except where the inputs for key and value are coming from now.
Nx: The Nx here simply represents that this block is chain-repeated N times. So basically you are stacking the block back-to-back and passing the input from the previous block to the next one. This is a way to make the neural network deeper. Now, looking at the diagram there is room for confusion about how the encoder output is fed to the decoder. Let’s say N=5. Do we feed the output of each encoder layer to the corresponding decoder layer? No. Basically you run the encoder all the way through once and only once. Then you just take that representation and feed the same thing to every one of the 5 decoder layers.
Add & Norm block: This is basically the same as below (guess the authors were just trying to save space)
Image by author
Everything else has already been discussed. Now you have a complete explanation of the transformer architecture building up from simple sum and product operations and fully self contained! You know what every line, every sum, every box and word means in terms of how to build them from scratch. Theoretically, these notes contain what you need to code up the transformer from scratch. In-fact, if you are interested this repo does that for the GPT architecture above.
Appendix
Matrix Multiplication
We introduced vectors and matrices above in the context of embeddings. A matrix has two dimensions (number or rows and columns). A vector can also be thought of as a matrix where one of the dimensions equals one. Product of two matrices is defined as:
Image by author
Dots represent multiplication. Now let’s take a second look at the calculation of blue and organic neurons in the very first picture. If we write the weights as a matrix and the inputs as vectors, we can write the whole operation in the following way:
Image by author
If the weight matrix is called “W” and the inputs are called “x” then Wx is the result (the middle layer in this case). We can also transpose the two and write it as xW — this is a matter of preference.
Standard deviation
We use the concept of standard deviation in the Layer Normalization section. Standard deviation is a statistical measure of how spread out the values are (in a set of numbers), e.g., if the values are all the same you would say the standard deviation is zero. If, in general, each value is really far from the mean of these very same values, then you will have a high standard deviation. The formula to calculate standard deviation for a set of numbers, a1, a2, a3…. (say N numbers) goes something like this: subtract the mean (of these numbers) from each of the numbers, then square the answer for each of N numbers. Add up all these numbers and then divide by N. Now take a square root of the answer.
Positional Encoding
We talked about positional embedding above. A positional encoding is simply a vector of the same length as the word embedding vector, except it is not an embedding in the sense that it is not trained. We simply assign a unique vector to every position e.g. a different vector for position 1 and different one for position 2 and so on. A simple way of doing this is to make the vector for that position simply full of the position number. So the vector for position 1 would be [1,1,1…1] for 2 would be [2,2,2…2] and so on (remember length of each vector must match embedding length for addition to work). This is problematic because we can end up with large numbers in vectors which creates challenges during training. We can, of course, normalize these vectors by dividing every number by the max of position, so if there are 3 words total then position 1 is [.33,.33,..,.33] and 2 is [.67, .67, ..,.67] and so on. This has the problem now that we are constantly changing the encoding for position 1 (those numbers will be different when we feed 4 word sentence as input) and it creates challenges for the network to learn. So here, we want a scheme that allocates a unique vector to each position, and the numbers don’t explode. Basically if the context length is d (i.e., maximum number of tokens/words that we can feed into the network for predicting next token/word, see discussion in “how does it all generate language?” section) and if the length of the embedding vector is 10 (say), then we need a matrix with 10 rows and d columns where all the columns are unique and all the numbers lie between 0 and 1. Given that there are infinitely many numbers between zero and 1, and the matrix is finitely sized, this can be done in many ways.
The approach used in the “Attention is all you need” paper goes something like this:
Draw 10 sin curves each being si(p) = sin (p/10000(i/d)) (that’s 10k to power i/d)
Fill the encoding matrix with numbers such that (i,p)th number is si(p), e.g., for position 1 the 5th element of the encoding vector is s5(1)=sin (1/10000(5/d))
Why choose this method? By changing the power on 10k you are changing the amplitude of the sine function when viewed on the p-axis. And if you have 10 different sine functions with 10 different amplitudes, then it will be a long time before you get a repetition (i.e. all 10 values are the same) for changing values of p. And this helps give us unique values. Now, the actual paper uses both sine and cosine functions and the form of encoding is: si(p) = sin (p/10000(i/d)) if i is even and si(p) = cos(p/10000(i/d)) if i is odd.